I’ve written this guide as I’ve had better experience with Nobara Linux than other distros when working with the software that I want to use.
Getting Started
Head over to Nobara’s download page and choose the best version of the operating system to suit your preferences. For simplicity’s sake, everything noted below is based on the default settings; like basically everything Linux, pretty much everything can be customised. These are the different types available (you only need one):
- Official – if in doubt, just download this one. It’s the default out-of-the-box experience
- GNOME (pronounced G’nome) – The main difference you’ll see is how the windows are handled. The desktop toolbar is at the top of the screen and there’s a quick launcher on the left
- KDE – A less-customised version of KDE that comes with the “official” version. Also less fine-tuned for gaming
- Steam-HTPC – The UI is designed for a more console-like experience
- Steam-Handheld – As the name implies, its UI is designed for handheld PCs
- Nvidia Downloads– Exactly the same as the list above, just with Nvidia drivers pre-installed. Use one of these versions if you have an Nvidia graphics card
You’ll need a USB drive that you’re willing to wipe clean. Needs to be at least 8GB.
Windows
- Download and run Rufus
- Pop in your USB drive
- Ensure that your USB drive is the correct one listed under “Device”. If you’re not sure, unplug the drive, see what’s missing from the list and plug it back in
- Select the ISO that you downloaded from the steps above under “Boot selection”. Everything else can be left as default. If prompted, select DD, rather than the recommended option
MacOS
The best way, technically, is to use DD on the command line. However, this comes with substantial risk and requires familiarity with the tool. Not recommended for beginners.
- Download and install BalenaEtcher
- Pop in your USB drive
- Open Etcher and select:
Flash from file: choose the Linux ISO
Select target: choose your USB drive
Flash - Enter your Mac password when prompted
Installing
Because every system can have different behaviours, based on how the system is configured, I can’t give you exact steps for ensuring that you can boot to the USB drive. These are the things to check:
- Shut down your PC and insert the USB drive (if not already). Unplug any other USB hard drives if applicable
- Try just powering on your PC as-is. If you see an unfamiliar display with options for Nobara, you’re good to go. If Windows boots, however, try one of the other options below
- Ensure Safe Boot is disabled in the BIOS/UEFI. You’ll need to consult your motherboard manual for guidance
- If you have the option on the splash screen that shows your PC or motherboard’s logo, press the F key that corresponds to “boot from USB”. This might be F12 or another function key
- If none of the above work select the option to boot from USB within your BIOS/UEFI
After booting to USB follow the official installation guide and post-installation steps from here: https://wiki.nobaraproject.org/en/new-user-guide-general-guidelines
Steam Games
Native Support
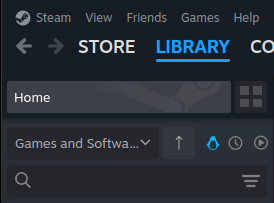
If your Steam game has native support this is by far the easiest option. Exactly the same as Windows, just install the game as normal from your library. You can tell which games are natively supported by clicking on this penguin (who is called Tux), which will show you all of your games that are natively supported on Linux:
Non-native Support
Recommended Prerequisite
Although not essential I would recommend opening ProtonPlus (pre-installed) and installing the latest versions of Proton-GE and Proton-CachyOS. This updates the list of available versions of Proton in the steps below.
Installing Non-native Steam Games
Steam games that are not natively supported on Linux have a decent chance of running well nowadays. If you have enabled the above filter ensure that’s deselected first so that you can see the games that are not natively supported. Please note that this may require some trial-and-error.
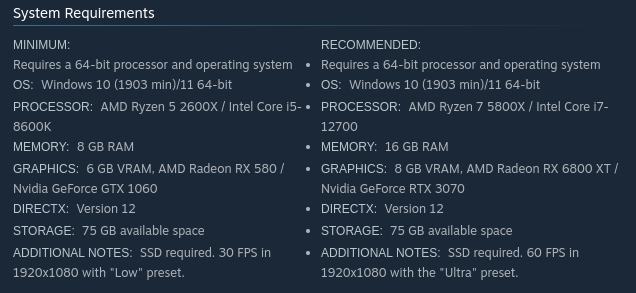
For the purpose of this example I’ll use Warhammer 40,000: Space Marine 2, which is not natively supported on Linux via Steam. You can also see this from the store page under system requirements (note that it doesn’t always show Linux here when natively supported):
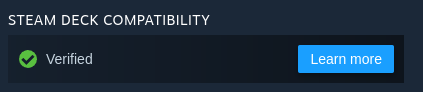
If you see this on the right side of the store page, by comparison, it will run natively on Linux:
Right-click the game in your library and select Properties then navigate to Compatibility. Tick the box for defining a version and select one of the Proton options:
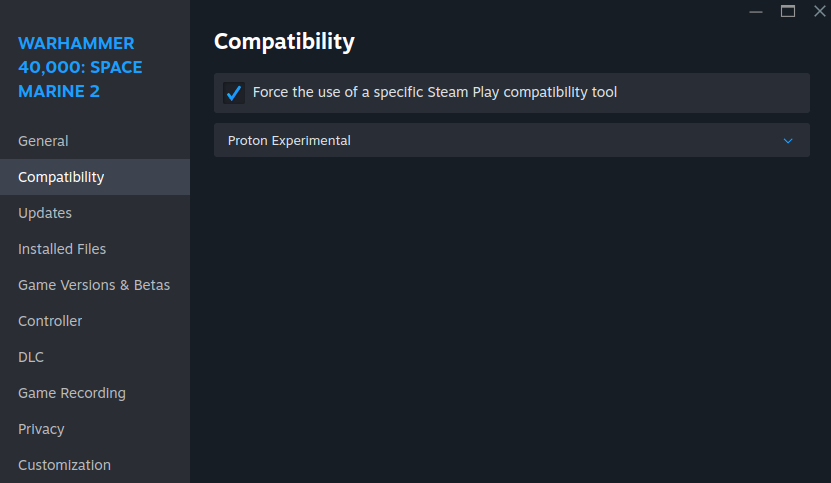
I know from experience that Proton Experimental works well with SMII but this is where the trial-and-error comes in. I would recommend testing the following order:
- Proton Experimental
- Proton 11 (or newer, if available)
- Proton Hotfix
- Proton 10 or older
Select the version that you’re going to test with, load up the game and see what the performance is like. If it’s inadequate try the next version on the list.
Important note: You will, most likely, not get the same experience as Windows because the game is not natively supported on Linux. Due to the nature of the install it has to go through a translation layer to make it so that a Windows game can run on Linux. It needs to go though an additional layer of communication to work like this. It’s kind of like having one person who only speaks English talking to another person who only speaks French and a translator is translating for each person. You’ll be able to communicate effectively but not as quickly and efficiently as someone who speaks the language natively.
A lot of the time you probably either won’t notice the performance difference or care. For example, if your PC is capable of running a game at 200FPS and you have the game set to match your monitor’s refresh rate of 120Hz (120FPS) then you won’t notice a difference if the game can only run at 150FPS on Linux, because the end result is 120FPS vs 120FPS (due to the FPS lock).
Bonus Add-On
If you regularly play retro games using an Emulator I would recommend downloading and installing EmuDeck, which is particularly useful if you use Steam in Big Picture mode (like a games console). This installs the prerequisites for emulating your games and (optionally) adds the list of games to your Steam library.
DaVinci Resolve
Nobara has a dedicated installer for installing DaVinci Resolve. Download the ZIP file for Linux from the official website and make a note of where you saved it to.
Open the Nobara Welcome App and select Optional Steps. From here, follow the prompts to open the DaVinci Resolve installer and select the ZIP file that you downloaded from the above step. The tool will take care of the rest.
Final Fantasy XIV
From the software installer (the icon in the bottom left, depicting a spanner in front of four squares) install the software called Discover.
Next, open Discover and search for XIVLauncher and install it. Open the XIVLauncher and everything else should be the interface you’re already familiar with.
As a reminder, XIVLauncher comes with Dalamud pre-installed so your mods should still work fine.
Note: On Windows’ native launcher your FFXIV configuration is in Documents/My games/Final Fantasy XIV – A Realm Reborn. On Linux it’s in a hidden directory: /home/your-username/.xlcore/ffxivConfig
Because .xlcore is hidden, press Ctrl+H in the file manager to show hidden folders. You can also open it directly from a terminal: xdg-open ~/.xlcore/ffxivConfig
These files are the same as the Windows’ ones so you can copy your configuration from your Windows Documents folder to the ffxivConfig folder. If cloud sync works for you, however, that is an alternative way to get your existing configuration copied over.
0 Comments