Monk
Positional Priority: Flank
Job Mastery Difficulty: Attack Rotation: Advanced ; Skill Knowledge: Intermediate
RP Non-WoL: Pugilist: Yes ; Monk: Probable
Pros: Fluid combat system. Able to restart their combo actions with no delay.
Cons: Short buff times. Consistent rotation and knowledge of the class is vital to mastering the class
Best Used By
- Players who love freeflow form with punishing damage. Thanks in part to the class’s utility they can easily top the DPS charts. Easy to play, Extremely difficult to master.
Special Notes
- Six Sided Star is ONLY to be used to disengage and is not meant to be part of your rotation.
- Only resort to using Celestial Revolution if your damage buff is about to fall off.
- Due to the constant drift of Riddle of Fire windows, mastery of the odd and even windows is essential to mastering the Monk class.
Rotational Tips
- Always re-up Twin Snakes and Demolish at <=5s left on buff
- Keep Riddle of Fire on cooldown. Do not let it drift for more than .5 seconds.
- Keep Brotherhood on cooldown.
- Buffed Bootshine/Shadow of The Destroyer must always be used as it is your highest potency attack.
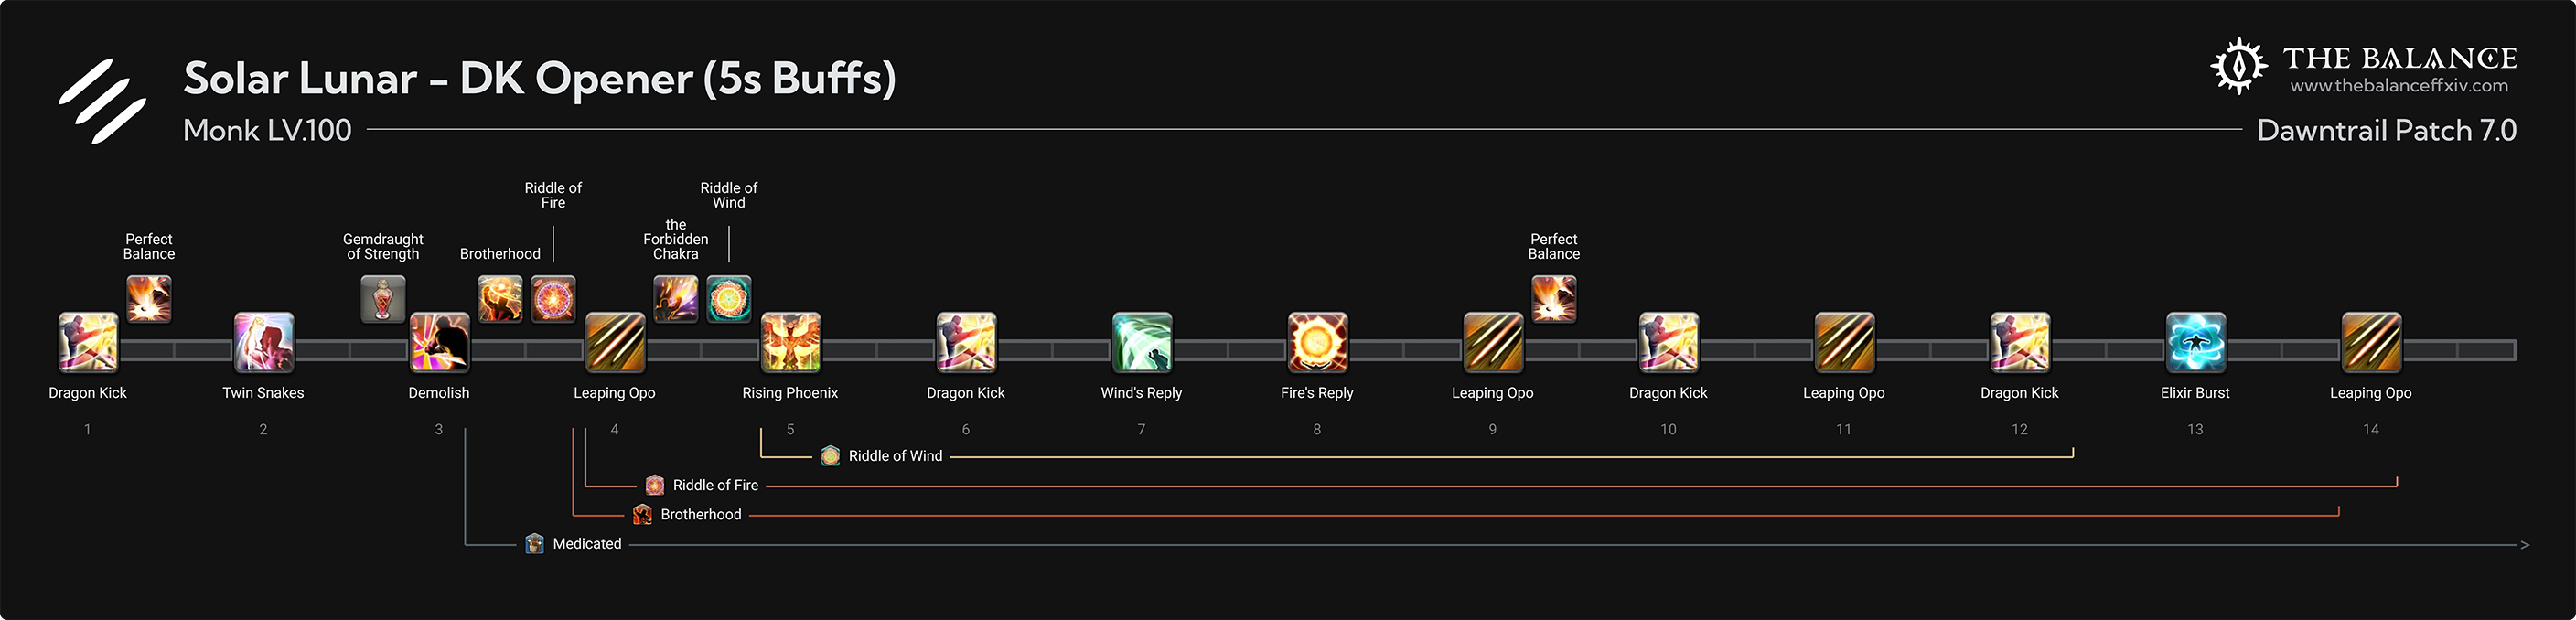
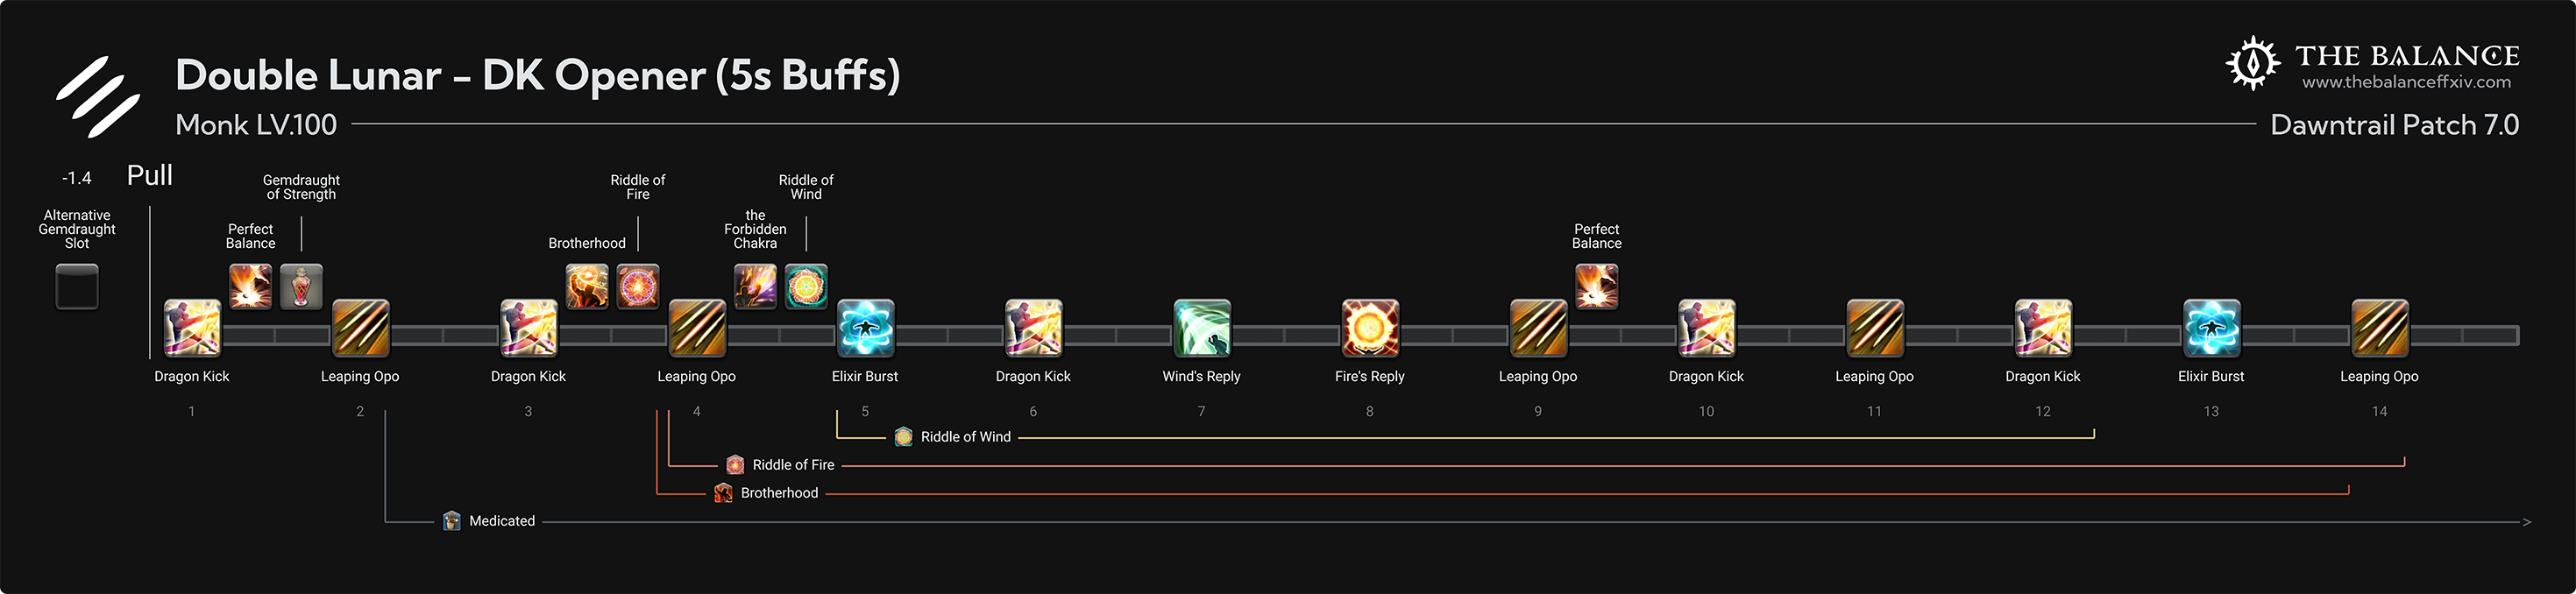
Which opener is best? Depends on the fight itself. Double Solar does more damage than a brain dead Lunar/Solar Opener and pushes Phantom Rush to our 2 minute window, but it can lead to DPS drop due to the additional Solar chakra. Each Opener has to be considered for each fight due to phasing, downtime, etc.
Patch 7.0 Opener and Rotations | The Balance: Monk
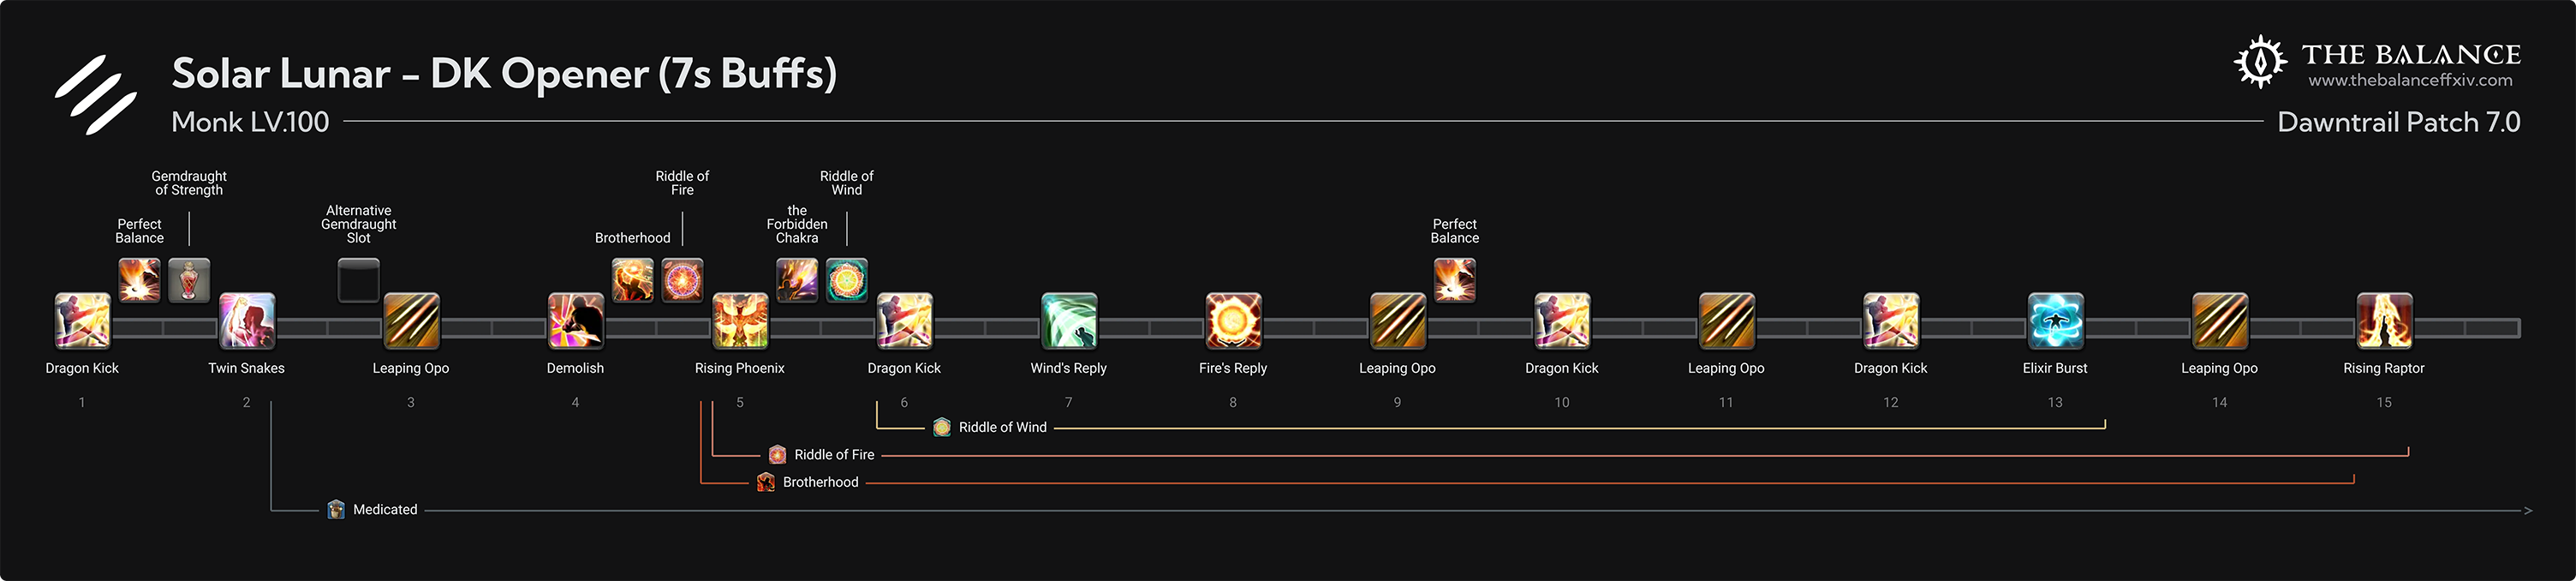
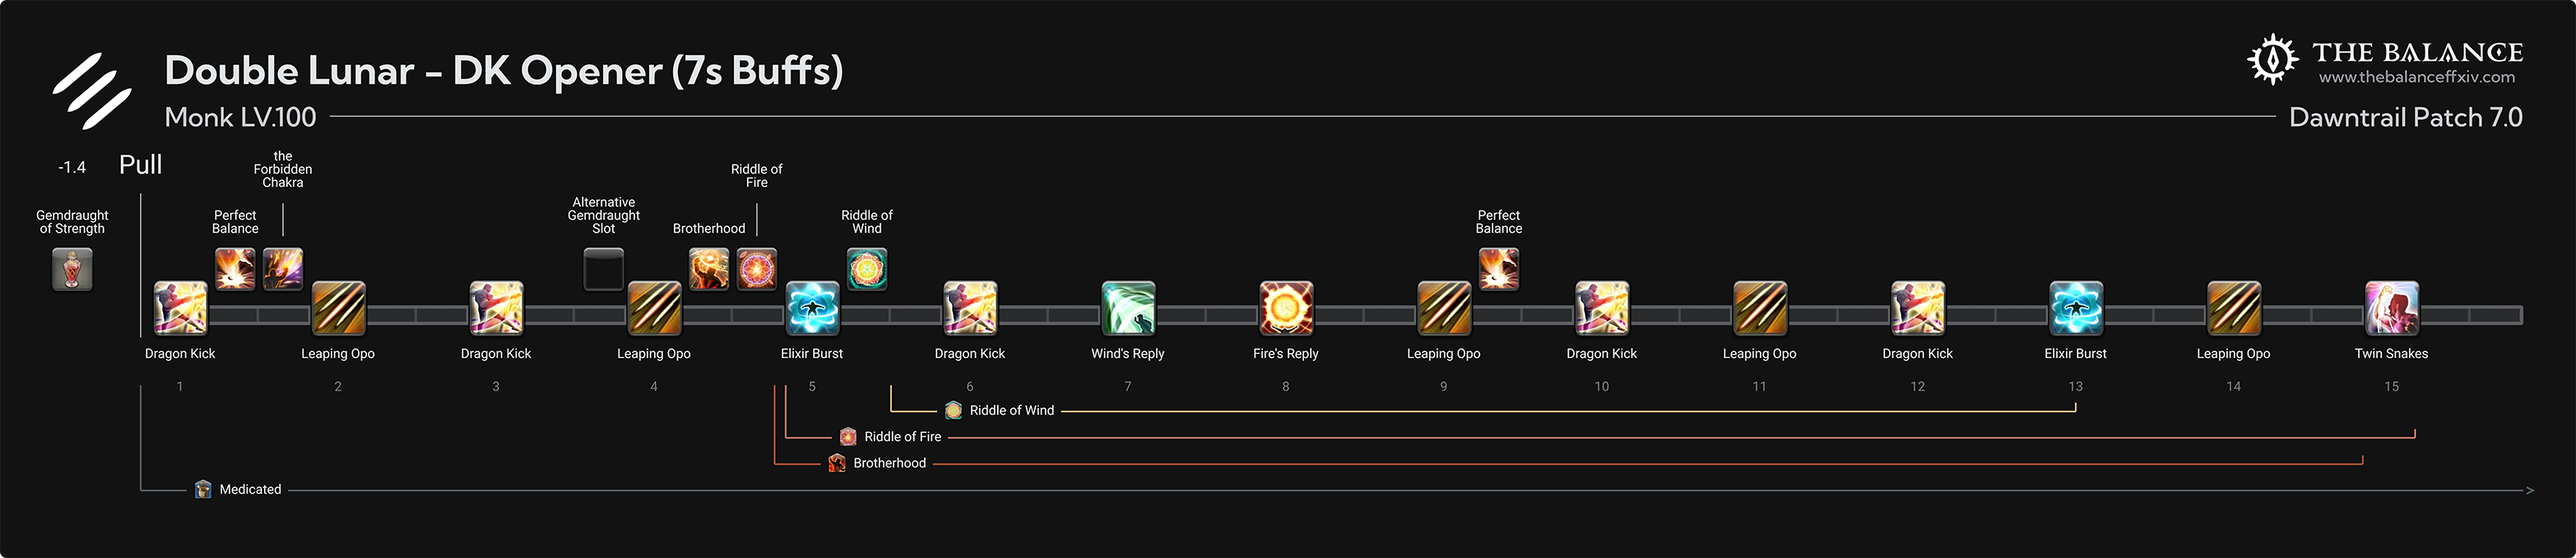
- Choose DK opener as your default.
- Opener changes will depend on your group’s buff timings or fight phase.
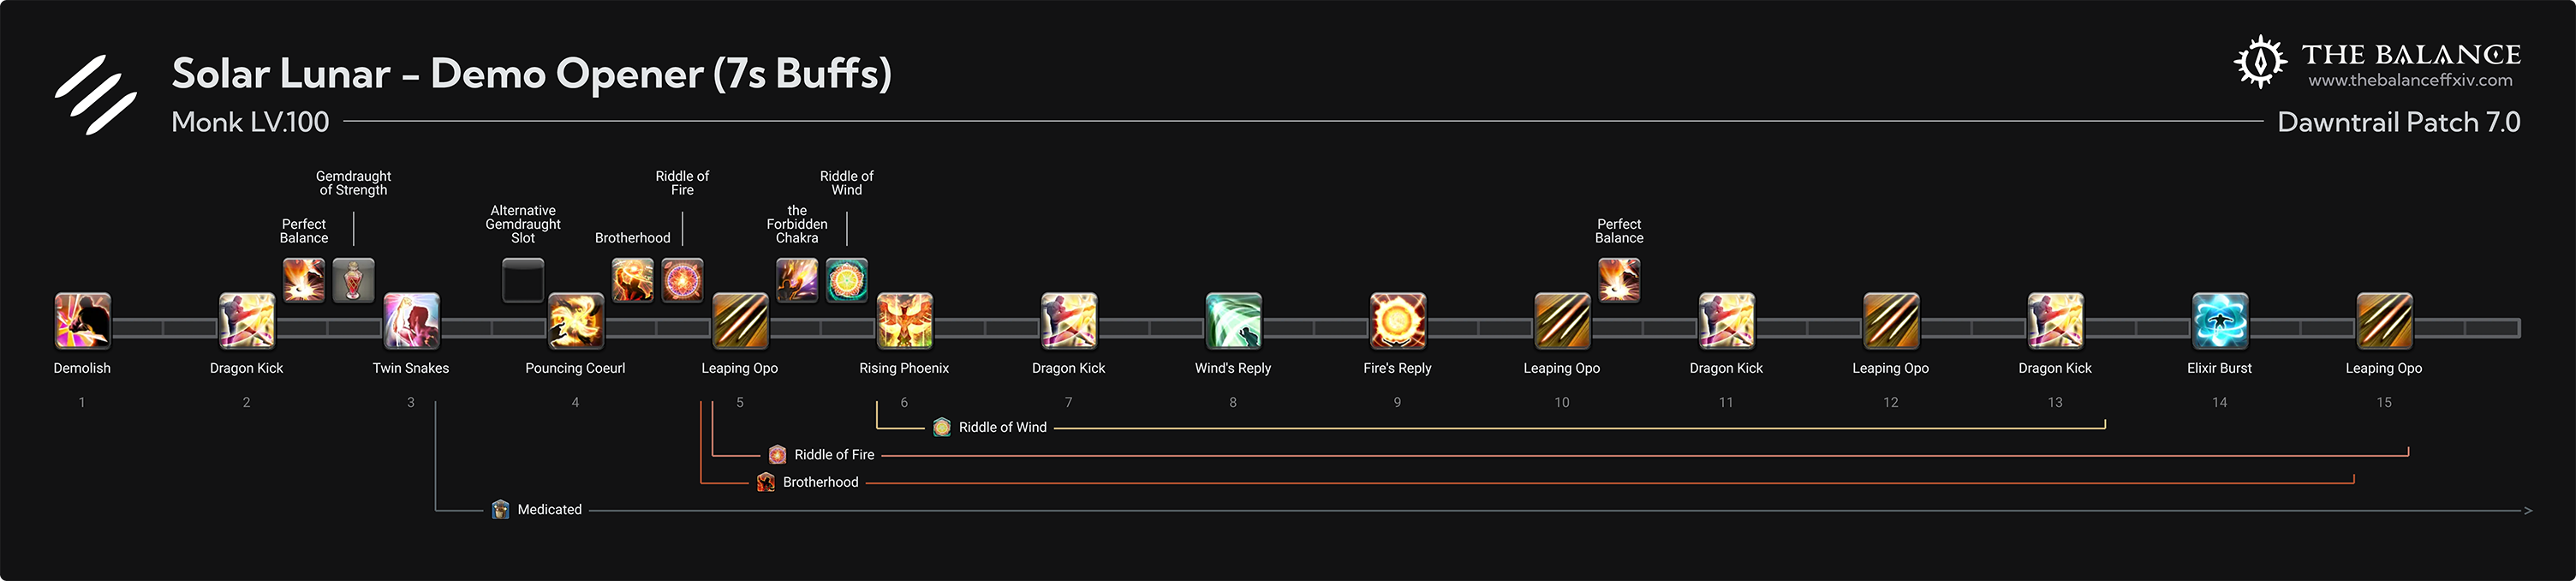
Solar Lunar
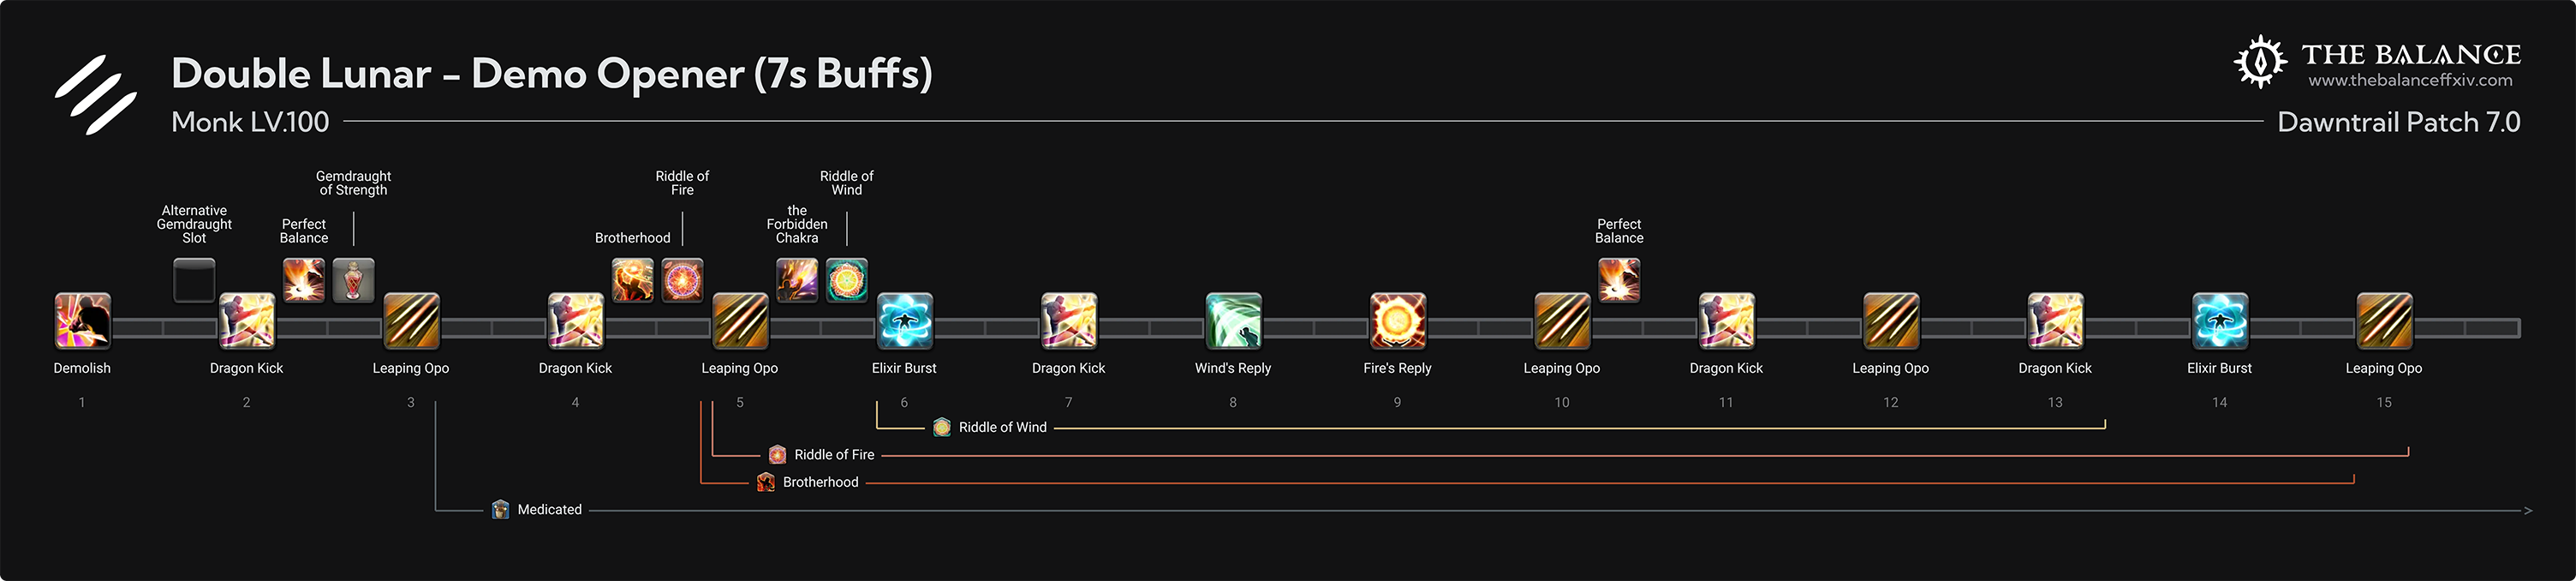
Double Lunar
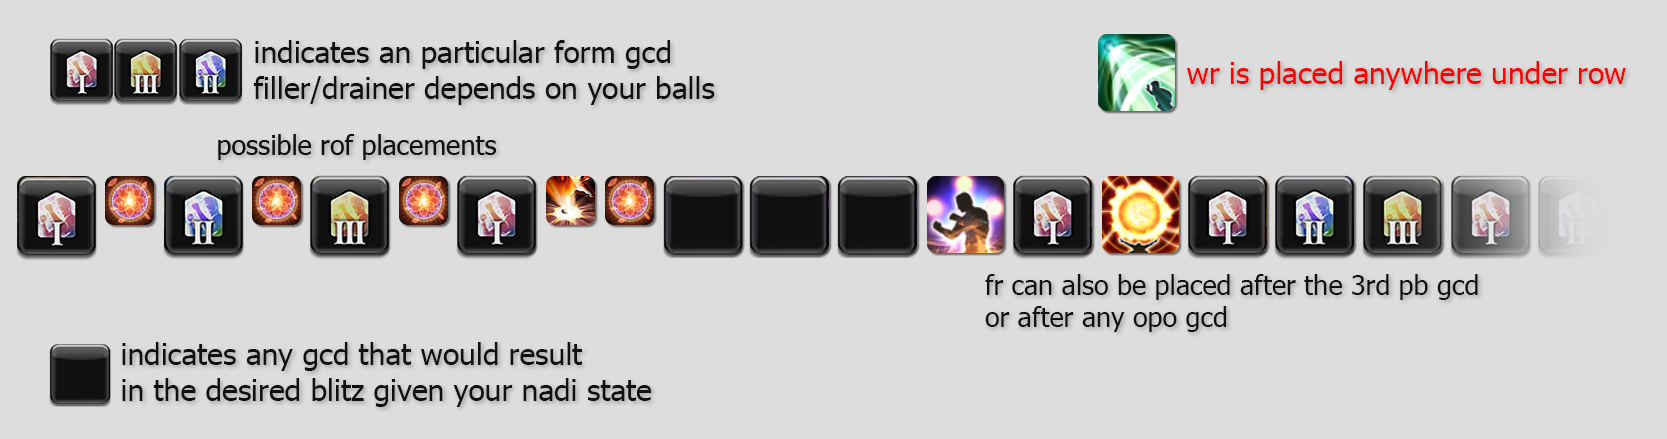
Extra Help
Even Burst Window
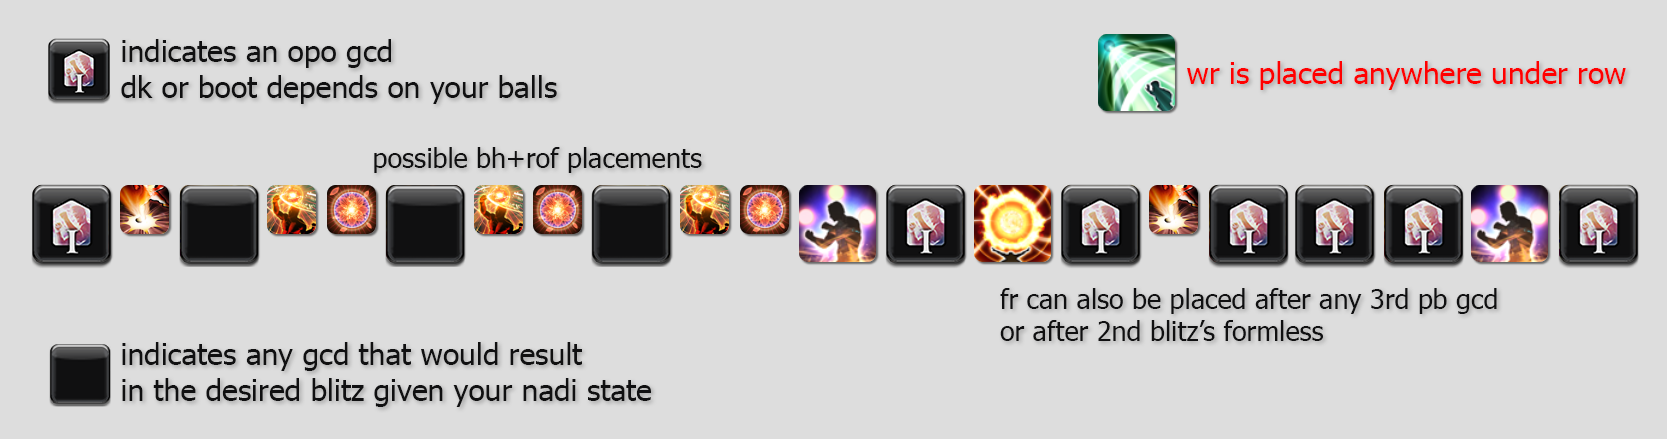
Odd Burst Window
・ ・ ・ ・ ・ ・ ・ ・ ・ ・ ・
Dragoon
Positional Priority: Rear
Job Mastery Difficulty: Attack Rotation: Expert ; Skill Knowledge: Intermediate
RP Non-WoL: Lancer: Yes ; Dragoon: Probable, but not likely
Pros: Solid rotation system and easy to weave
Cons: Strict Combo system means breaking combo actions is disastrous.
Best Used By
- Players who are great with keeping a strict rotation. Good Learning curve for this job.
Special Notes
- Dragonfire Dive and Spineshatter Dive are gapclosers so take extra precautions if there is an incoming mechanic that may place your character into a mechanic.
- Dragon Sight’s targeting sucks. Use a macro to designate someone via mouseover () or hard target (<2>).
- Dragon Sight Priority is (regardless of gear/skill): SAM > NIN > RPR > MNK/DRG > DNC/BRD > BLM > RDM > GNB > DRK/MCH > SMN
- Patch 6.4: Jump/High Jump have their movement displacements removed and the camera no longer bounces with the ability.
Rotational Tips
- Never double weave Stardiver.
- You can double weave High Jump, Spineshatter Dive and Dragonfire Dive together, if your ping is less than 40ms. Otherwise, double weave High Jump with any other oGCD skill. If your ping is >140ms, stick to only single weaving High Jump, Spineshatter Dive and Dragonfire Dive.
- Hold Life Surge and Spineshatter Dive for buff windows, but don’t overcap.
- Life Surge will always land on Heaven’s Thrust or 5th combo hit.
- Delay Life of the Dragon for party buffs.
Patch 7.0 Opener and Rotations | The Balance: Dragoon

Alternative Openers

・ ・ ・ ・ ・ ・ ・ ・ ・ ・ ・
Ninja
Positional Priority: Rear
Job Mastery Difficulty: Attack Rotation: Advanced ; Skill Knowledge: Intermediate
RP Non-WoL: Rogue: Yes ; Ninja: Probable
Pros: Unparalleled movement capability due to Shukuchi teleporting them to safe locations at will. Faster than other DPS classes.
Cons: Mistimed abilities is absolutely punishing to a Ninja. Relatively weak compared to other melee DPS classes.
Best Used By
- Players who are “greedy” in their DPS and need the extra mobility to avoid damage.
Special Notes
- Latency is a huge concern for using any mudra actions as a lag spike can cause a failed mudra. Also double weaving requires a ping of ~40ms to be clean.
- Huraijin is only for Huton recovery after death, long transition time, or if the boss is pulled early.
- Missing any buffs as a NIN is disastrous to the entire party’s overall DPS. Don’t ever delay Mug / Trick Attack for more than 1 GCD.
Rotational Tips
- Doton, Death Blossom, Hellfrog, Katon/Goka Mekkyaku should only be used on 3 or more targets. Furthermore, Doton should not be used if targets will not remain for the full 18s.
- Keep Bunshin on Cooldown.
- Do not break Forked/Fleeting Raiju with an Aeolian Edge combo.
- If cooldowns are misaligned from Trick Attack, continue using them instead of attempting to realign.
- Since Bunshin is used on cooldown, only use Phantom Kamaitachi during Mug and never in Trick Attack. You may use it if Mug and Trick are woven together, or if Mug is 1 GCD before Trick.
Patch 7.0 Opener and Rotations | The Balance: Ninja
・ ・ ・ ・ ・ ・ ・ ・ ・ ・ ・
Samurai
Positional Priority: None
Job Mastery Difficulty: Attack Rotation: Advanced ; Skill Knowledge: Intermediate
RP Non-WoL: Yes
Pros: Absolutely punishing attacks. Restarting their rotation is relatively easy.
Cons: Absolutely no party utility. Vast array of skills can be dizzying.
Best Used By
- Players who are great at utilizing a dizzying amount of skills. Best for advanced players.
Special Notes
- Weaving is essential to maximizing the strength of the Samurai.
- With no positional priority, forehand knowledge of the duty will greatly aid when to use True North to maximize damage bonuses.
- Know your GCD speed to best use this class. Because Shifu adjusts the GCD speed, The SkS Range Table will be presented here:
503 - 648 = 2 Filler GCDs985 - 1,174 = 3 Filler GCDs1,453 - 1584 = 4 Filler GCDs - When you do a Gap Closer follow that with Enpi as your 1 Filler GCD, make sure to add another Gap Closer and Enpi to satisfy the 2 Filler GCD req or if you are a 3 Filler requirement, adding Hakaze – Yukikaze will satisfy the 3 Filler GCD req. Always use Hagakure at end of your filler GCDs, if your fillers generate Sen to avoid jarring your rotation.
Rotational Tips
- Meikyo Shisui will be used once per odd and even burst.
- Use Shoha and Shinten when necessary to avoid overcap.
- Do not overcap on Sen or Kenki.
Patch 7.0 Opener and Rotations | The Balance: Samurai
・ ・ ・ ・ ・ ・ ・ ・ ・ ・ ・
Reaper
Positional Priority: None
Job Mastery Difficulty: Attack Rotation: Advanced ; Skill Knowledge: Intermediate
RP Non-WoL: No
Pros: Solid DPS dealer with a speedy setup.
Cons: Missing combo actions can lead to an absolute disaster due to the dependency of the gauge system to execute powerful attacks.
Best Used By
- Players who love speed, strength and precision with their job. One of the more Casual Friendly DPS classes.
Special Notes
- Never let Death’s Design fall off the target.
- If you are not as strong with the class, a triple Enshroud rotation should be avoided as this will cause a significant DPS loss overtime if executed right before the 2 minute window of pot/raid buffs. That being said, it can be beneficial if pots are delayed to allow for three Communios to be executed during pot windows.
Rotational Tips
- Always have Harvest Moon up prefight and try to use Harpe before the pull. If in the case of a no countdown opening, forgo Harpe and start with Shadow of Death.
- Use Shadow of Death to prevent fall off of Death’s Design or as a filler GCD to keep Death’s Design up during Enshroud Windows. Do Not reup unnecessarily.
- Harvest Moon is a filler GCD where you will use it to maximize uptime when unable. Always refill Harvest Moon during downtime.
Patch 7.0 Opener and Rotations | The Balance: Reaper
・ ・ ・ ・ ・ ・ ・ ・ ・ ・ ・
Viper
Positional Priority: None
Job Mastery Difficulty: Attack Rotation: Intermediate ; Skill Knowledge: Intermediate
RP Non-WoL: Yes
Pros: Easy to play with each button lighting up to guide its use.
Cons: Ping is brutal with the class. The higher your ping, the harder it is to weave.
Best Used By
- Players who enjoy a speedy class and can double weave.
Special Notes
- Bank one Rattling Coil for disengagements, but make sure to spend them.
Rotational Tips
- Keep both Hunter’s Instinct and Swiftscaled up at all times.
- Use Serpant’s Ire first and use the “Ready to Reawaken” buff first.
Patch 7.0 Opener and Rotations | The Balance: Viper

・ ・ ・ ・ ・ ・ ・ ・ ・ ・ ・
0 Comments