The Hitbox
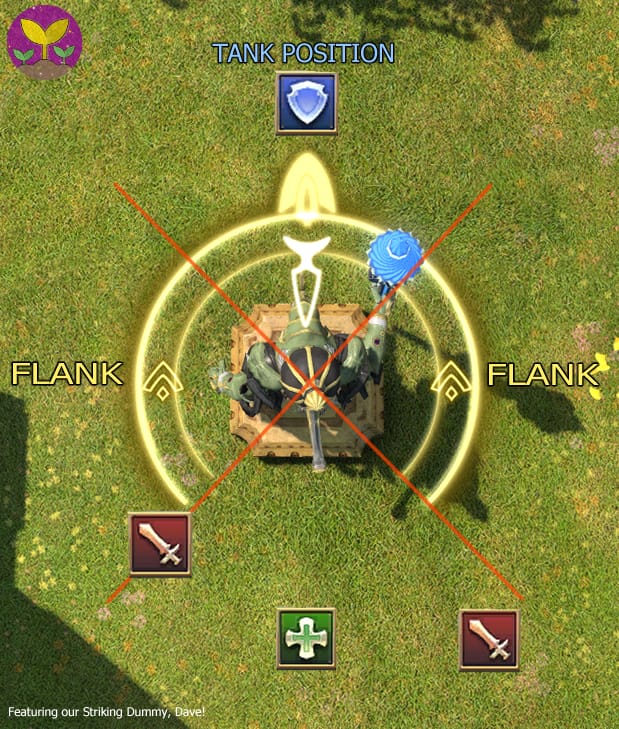
All enemies in the game have a “hitbox”.
- If 1/4 of the circle is broken, that indicates positional attack bonuses apply.
- A complete circle indicates no positional requirements and all attacks will apply bonus damage. More importantly, the positional bonus applies inside the hitbox as well.
- There is no need to run out to the “Maximum Melee Distance” of the positional for the bonus damage.
- If the boss cleaves, avoid the front “Tank Position” area.
・ ・ ・ ・ ・ ・ ・ ・ ・ ・ ・
Battle Markers
Circle Stack
Group up (stack) under these to share damage with your teammates.
• The more people who stack, the less damage is done to all.
• If there are multiple markers, spread into multiple groups.

Line Stack
Line up in a group in these to share damage with your teammates.
• The more people who stack, the less damage is done to all.
• If there are multiple markers, spread into multiple groups.

Danger Zones
Avoid orange floors, these are a danger zone and will cause damage. (Stay out of the Orange Juice.)
• These come in many different shapes and sizes!
• These can be partnered with almost any other mechanic.




Gaze
Applies a negative effect if you’re looking at the “eye” when the cast goes off.
• Look away from the enemy.
• Gaze can come in a cone AOE as well as a room-wide. Avoid the cone and you’re fine; otherwise, look away.
• Gaze can also come in a stack! For these, stack together, but do not look at the player who has the stack marker.

Proximity AOE
Deals damage relative to the distance from the impact.
• Run as far away from the center of this mechanic as possible.
• Can sometimes cause knockback.

Red Danger Disk
An AoE that expands over time.
• Stay out of these, they cause intense damage.

Flare
Does high damage to its target and distance-based damage to everyone else.
• The target and group should move away from each other.
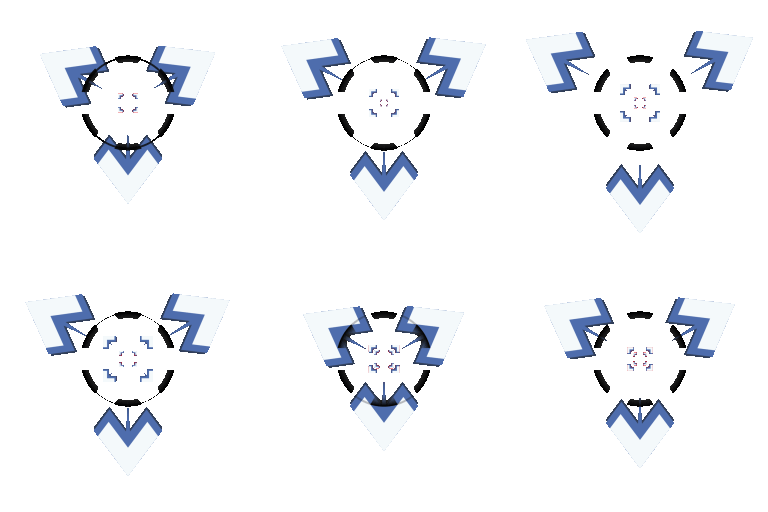
Basic Target
This indicates the target of some kind of mechanic, these come in many flavors.
• More often than not, you want to get away from this and you don’t want to overlap them.
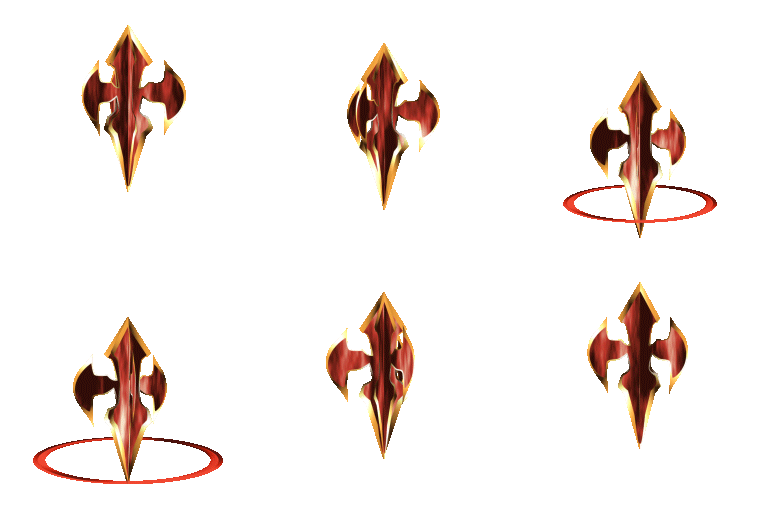

Tank Buster Circle
This does massive damage to the target and everyone around them.
• Tanks should take these solo.
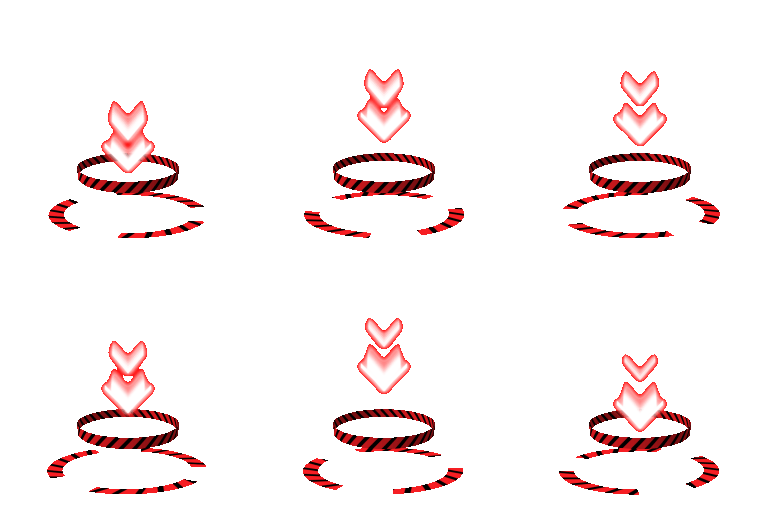
Tank Buster Line
This does massive damage to the target and everyone in a line.
• Tanks should take these solo.
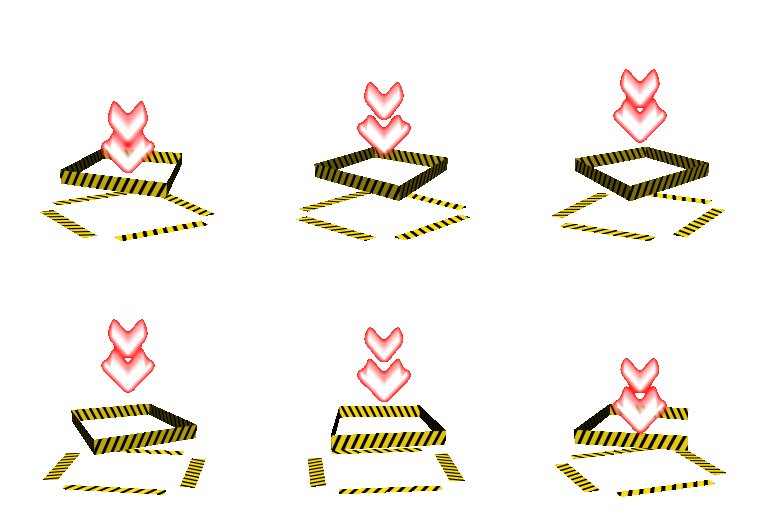
Distance Tethers
These deal high damage based on distance.
• Run away from what you are tethered to, sometimes the tether will change color.

Chain/Fire Tethers
This chains you to another player, causing damage over time.
• Try to be close to your partner before it’s applied.
• Run away from each other to break the tether.

Purple Helix Tether
If tethered to Boss:
• Boss is immune until tethered adds are killed.
If tethered to You:
• Run away from the source.
• Will do damage over time or apply a negative status effect.

Orange Snipe Tether
Marks target for an upcoming mechanic.
• Can sometimes be passed to other players by running through the tether.

Magnetism
Pulls opposing marks together.
Pushes similar marks apart.
• Be aware of where you will be pushed or pulled, this will sometimes align with other mechanics that will hurt you if moved into.


Acceleration Bomb
Deals damage and knocks the player into the air when the timer ends.
• Stop moving and attacking before the debuff expires, to avoid damage.

・ ・ ・ ・ ・ ・ ・ ・ ・ ・ ・
Active Time Maneuver
How to do an Active Time Maneuver:
Mash every button on your keyboard/controller!!

・ ・ ・ ・ ・ ・ ・ ・ ・ ・ ・
Rotation Styles
Optimal rotations are the bread and butter of every class. As we all have heard, “Always Be Casting” or “Always Hit with Stick” or “Always have your GCDs rolling”, effectively utilizing every weapon skill and ability can be a daunting task to work everything together to make them work. Some jobs are a lot more free form and others require rigid discipline.
Freeflow style: Warrior, Monk, Dancer, Red Mage, Reaper
• These jobs don’t have a rigid rotation, but instead require mastery of the class to use them effectively. Knowing the job and knowing the fight is absolutely critical to be successful.
Consistent Precision Style: Paladin, Gunbreaker, Dragoon, Samurai, Machinist
• These jobs are highly focused classes that require discipline to play. Every action for these jobs require precise timing to make them successful. Every skill and ability has their place and will be used at nearly the same spot every time.
High Burst Style: Dark Knight, Ninja, Bard
• These jobs expend all of their big stuff in the beginning and every two minutes with maintenance in between. They don’t use a lot of other special abilities outside of their windows.
Technical Style: Black Mage, Summoner
• The Black Mage is the one job that really has no classification. The job works really well with standard and nonstandard play. Standard play is very precise and consistent, however, nonstandard play requires absolute job mastery to make them highly effective. In any content that is rated Extreme or higher, job mastery is required to make them shine.
• Though Summoner is a consistent precision style, there are other ways to play Summoner that will be more beneficial. I.e Using Ifrit first then Garuda then Titan due to specific phases of a fight. So, while not as precise, the core ability of SMN at Lv. 90 of using the demi summons are always going to be in the same spot.
・ ・ ・ ・ ・ ・ ・ ・ ・ ・ ・
Weaving vs. Threading
Weaving is the act of using an oGCD while the GCD is “rolling” (or finishing its recast time). The important part of weaving is to NOT to clip your GCDs. What that means is never use an oGCD when your GCD is up. For example, with the BRD, you want to use Venomous Bite and while the GCD rolling, use a Bloodletter, and then a Windbite. In a standard 2.5 recast time with a BRD, you can double weave two Bloodletters but you can run into the issue of clipping your GCD if your latency causes you issues or if you are unfamiliar with the practice. For Tanks, this practice is vital. All mitigations are oGCDs, so endeavor to use all mitigations by weaving them as much as possible.
Threading is the act of using a casted ability and immediately following the cast with an instant ability. For those with high latency, this can be a boon to output, but is not a good practice for those with low latency
・ ・ ・ ・ ・ ・ ・ ・ ・ ・ ・
Commonly Forgotten Abilities
Reprisal – A 60s ability that reduces the damage dealt by nearby enemies by 10% – In light party situations this is one of your rotational mitigation abilities, however in boss fights, it is best served to reduce oncoming arena-wide damage to the entire party to reduce healing downtime; work with your co-tank to see who will mitigate first with oncoming damage.
At Arm’s Length – While this is also used by all physical jobs, for a tank this is also a mitigation ability to slow down mobs. It is ineffective against bosses, however, its ability to prevent knockback is a good protection method if you are unable to align yourself to safely resolve a mechanic.
PLD only – Cover – takes 100% of incoming damage from the designated player – This ability is great to take damage from a player that is low on health or dying, and with the combo of using divine veil can furnish a shield to the rest of the party after receiving healing, HOWEVER, the damage received through Cover is applied to the PLD without calculating the PLD’s own mitigation. For best use, if a PLD is to choose a Healer for a cover target, the PLD should use Intervention on the target and Cover to mitigate some of the oncoming damage. This ability can also be used to negate a tank swap (provided the tankbuster does not apply a Physical/Magic vulnerability debuff)
• In the case of a Twin Tankbuster mechanic – This can be used by the PLD to “cheese” through the mechanic. Apply Cover to the Co-Tank, Apply Hallowed Ground and when the attack resolves, only one tank needs to be healed. This will alleviate stress to the healers as only one tank needs to be healed instead of two. Warning, this will also cause the PLD to receive two debuffs (if applicable)
Addle (Caster)/Feint (Melee) – This is a mitigation technique used to prevent damage from a target – in boss fights this should be used prior to an Arena Wide AoE.
Troubadour/Tactician/Shield Samba – Unfortunately, while the end effect is roughly the same, they do not stack. If you have another Ranged DPS within your party, coordinate who should use theirs first to mitigate oncoming damage.
Mantra (MNK)/Nature’s Minne (BRD) – Boosts Healing for the party. This helps your party to recover faster from arena-wide attacks. Call out when you use this to prevent over-healing and overlapping of the abilities.
The Warden’s Paean (BRD) – Removes a debuff that can be cleansed typically by Esuna (Grey Bar on top of debuff). Can also be used to preemptively place a shield to protect a player from being afflicted by paralysis or a bleeding debuff.
・ ・ ・ ・ ・ ・ ・ ・ ・ ・ ・
One-Min & Two-Min Damage Windows
The points in the battle where the most amount of party wide buffs are available to execute the most amount of damage to the boss. One minute windows (or odd windows) are typically your standard 60s cooldowns coming back up to do damage. The most important window will always be the two minute (or even windows). 120s buffs will be back up and executed by your party at this time.
If you are in the middle of a fight and mess up your rotation, ideally, you will want to correct as much as you can (without sacrificing DPS to the best extent possible) during the odd windows to be ready for the even windows to try and execute the best amount of damage your job can provide. To further illustrate, the battle will always start on the even window, after completion of everyone’s openers, buff should be aligned for the next even window.
It is imperative that between the opener and the next even window, one minute buffs and attacks are being utilized at the correct time so they do not get pushed out of the top of the even window. When you do hit your even window, you should aim to be redoing your opener or similar to your opener to push out damage as everyone’s party buffs will be contributing to that portion
・ ・ ・ ・ ・ ・ ・ ・ ・ ・ ・
Optimizing Rotations
While the Balance is wonderful for theory building rotations and openers, a lot of the instances and fights still require the player to know when to winddown or switch up attacks to keep DPS going when it is impractical to do a standard rotation. There will also be times when the boss will start a downtime phase and will be untargetable. Before this sequence starts, it is best to hold onto any buffs or DoTs (as DoTs don’t do any damage during this phase) and continue with a standard attack pattern without buffs. That way when the boss comes out of the downtime phase, you can start with a full opener again to do more damage as the boss comes out of it.
Knowing when to hold buffs to get the best mileage out of them is the key to victory. For example, with the MNK, it is impractical to continue doing damage when a close range mechanic around the boss will happen. Take that time to rebuild the Chakra gauge and come back in with a charged Forbidden Chakra again.
・ ・ ・ ・ ・ ・ ・ ・ ・ ・ ・
Damage Buffs
In the case of Melee DPS or jobs with a rotational buff (meaning within their GCD chain), this should always be on 100% of the time. Some classes carry an oGCD ability that buffs their attacks.
When planning out your rotation for jobs that have an “external” buff ability (or a buff that is on an oGCD), keep in mind that you want to activate the skill when it does the most benefit.
Using the PLD as an example, you want to weave “Fight or Flight” right before “Riot Blade” to fit two “Goring Blades” (Paladin’s DoT; Once at the beginning of the window and right before it falls off) and maximize the GCD attacks that will benefit from Fight or Flight.
Jobs like SMN where the Damage Buff is a party wide buff, you want to time the buff closer to when everyone is starting their “burst” (or when people are about to send out a crap ton of damage in a short span of time). Typically, this will be between the 2 and 3rd GCD window. This allows for maximum use of the buff to be applied to the party.
・ ・ ・ ・ ・ ・ ・ ・ ・ ・ ・
Server Ticks & HoTs/DoTs
Server Tick is 3 seconds in the game. Any buffs/debuffs will be applied every server tick. For instance, if a bleed debuff is placed for 30s for a potency of 100, the resulting damage will be 1000 potency applied to the player. In PvP, points applied from any captured nodes will align with server tick. This is also why every over time buff/debuff in the game is divisible by 3. HoTs or Healing over Time is the residual regen effect placed on a player. To calculate the total potency, it will be 18s/3s * 250 resulting in 1,500 potency over the duration of 18s. DoTs or Damage over Time is a useful debuff placed on the enemy to drain their health over time.
A very important thing to remember is that DoTs are the same as attacks and will be buffed by Critical Hits, Direct Hits and Damage Up buffs. DoTs will continue with the buffed stats through its entire duration even when the buff itself has worn off which is why it is important not to “clip” the DoT by reapplying the DoT with a non buffed version. Example: A buffed Demolish from a Monk with all their buffs will be a 70 potency attack plus 20% damage bonus (Brotherhood + Riddle of Fire) for the entire duration of 18 seconds. Reapplying the buff too early and the DoT will only carry the 70 potency for 18s. Mathematically, it is a difference of 504 potency vs. 420 potency. When should I reup? Usually within <5s left of the buff.
・ ・ ・ ・ ・ ・ ・ ・ ・ ・ ・
Transcendent Buff
This buff is applied for 5s after being revived from being KO’d during a fight. The buff is an invulnerability buff that prevents the player from taking ANY damage for 5s (any status debuffs will still be applied but no damage will be applied to the player). The player that has been recently revived should quickly run to the healer (if they moved due to mechanics and the action sprint does count as an ability and will remove the buff) and receive a heal before committing to any actions.
Note: This does not apply to those revived via the Healer’s LB3. Also, if you were in an area where you character is in a instagib zone, you will promptly fall back over again.
・ ・ ・ ・ ・ ・ ・ ・ ・ ・ ・
Dungeon Mitigation vs. Boss Mitigation
In Dungeons, if you are doing the wall to wall pulls (w2w), you always want to start with a Long Cooldown (120s). Since trash mobs are affected by status effects, you do have the ability to use your knockback prevention (At Arms’ Length) to assist with mitigation. At later levels, you want to add more mitigation to your pulls, to alleviate stress on your healers by using a short cooldown (30s) with your long cooldown. As the fight wears on, you’ll want to cycle through your mitigations, so after Sentinel falls off, put on Reprisal or Rampart. Avoid using a Long Cooldown with a Long Cooldown together. If things are going south rather quickly, don’t be afraid to use your invulnerability slightly early to keep yourself up.
For Example, in a W2W with a PLD, you want to use Sentinel at the onset, then add Holy Sheltron to mitigate damage further to keep your health within manageable range. Moving to use Reprisal next as the battle wears on and your Sentinel falls off. In Boss Fights, mitigate as needed.
Tankbusters, for instances beyond Level 50, should always be taken with a Long Cooldown and a Short Cooldown mitigation ability. Raid wides are mitigated by using either the party mitigation ability or by using Reprisal. As a general rule of thumb, avoid using mitigation unless there is a casted ability or a cleave that will deal heavy damage. With a solid attack rotation, any self healing ability should be left for emergency use or when healers are overwhelmed as you should be doing enough damage to recover from auto attacks and need only some spot healing from the healer. Notable exception is the DRK. As they do not have a self heal ability, they need to use the extra mitigation to recover from attacks and be extra careful with their HP.
To further illustrate mitigations:
All tanks have will have:
- Rampart (20%)
- Reprisal (10%; best served to mitigate party wide attacks as this will reduce damage coming from the enemy)
- At Arms’ Length (+20%; applies ‘Slow’ to enemies and therefore only applicable to mobs)
- 30% mitigation (PLD – Sentinel, WAR – Vengeance, DRK – Shadow Wall, GNB – Nebula)
- Short CD mitigation technique:
- PLD – Sheltron [Lv.35]/Holy Sheltron [Lv.82] ; Shareable Version – Intervention [Lv.62]
- WAR – Raw Intuition [Lv. 56]/Bloodwhetting [Lv. 82] ; Shareable Version – Nascent Flash [Lv.76]
- DRK – The Blackest Night [Lv. 70]
- GNB – Heart of Stone [Lv.68]/Heart of Corundum [Lv.82])
- Party Mitigations (Use these to mitigate damage when the boss is untargetable, during a stack marker or to boost mitigatation):
- PLD – Passage of Arms (15% for party, Personal Mit %= Block Rate/ Divine Veil (10% of your Max HP as a shield for the party only
- WAR – Shake It Off (15% of your Max HP as shield, +2% for removing the buff(s): Thill of Battle, Vengeance, Bloodwhetting)
- DRK – Dark Missionary (10% Magic Damage Mitigation)
- GNB – Heart of Light (10% Magic Damage Mitigation)
- Invulnerability (to MOST attacks)
- PLD – Hallowed Ground (100% damage mitigation)
- WAR – Holmgang (HP cannot go below one; locks target and effect ends when target’s HP goes to 0 [therefore it is better to target yourself and use the ability])
- DRK – Living Dead (HP must go to 0 for the effect to activate and will be invulnerable for 10s. Requires HP to be at 100% before expiration of Walking Dead)
- GNB – Superbolide (HP goes to 1 and will be invulnerable for 10s; best used alongside Aurora and any mitigations to increase HP to survivable range)
Special Mitigations:
- DRK: Dark Mind (20% Magic Mitigation)/Oblation (10%; up to 2 stacks)
- GNB: Camouflage (50% parry rate and 10% mitigation)
・ ・ ・ ・ ・ ・ ・ ・ ・ ・ ・
Limit Break Rescue
Due to the animation lock of limit break, a healer can rescue a party member during the limit break animation. Once the cast timer for limit break has been completed, the healer can rescue the party member. This is to make sure the party member can resolve an ongoing/upcoming mechanic that may have started during the attack or cast.
Note: After being rescued, the member that casted the Limit Break can not perform any actions until after the animation sequence has been completed. They can, however, move around.
・ ・ ・ ・ ・ ・ ・ ・ ・ ・ ・
Tank Swapping
Standard Tank Swap: The MT drops their tank stance to stop generation of enmity, uses the ability Shirk to the OT (now MT). The OT turns on their tank stance and provokes the target. If the target is not fully focused on the new MT, use the tank’s ranged attack until sufficient enmity is generated to flip the enmity to A on the new MT.
Quick Tank Swap: Another way to ease the transition from OT to MT is for the OT to turn their tank stance on after the MT has completed a full rotation. During the transition, merely using Provoke or a Ranged Attack will complete the swap.
Two Hit Tankbusters: During the cast of the tankbuster, perform the Tank Swap, so that the secondary attack lands on the new MT.
Double Tank Swap: Same as a Standard Tank Swap but the old MT re-attains through provoke and/or repeated ranged attacks.
・ ・ ・ ・ ・ ・ ・ ・ ・ ・ ・
0 Comments